Table of Contents
Section 3 - Setting up Raspbian
Install Raspbian Lite
This section describes the basic installation of Raspbian onto your Raspberry Pi. If you know how to install Raspbian, and already know how to connect up everything, please feel free to skip to the next section!
- Download the latest version of Raspberry Pi OS Lite onto your hard disk. You may obtain it from:
https://www.raspberrypi.org/software/operating-systems/- At the time of writing, the latest version was December 2nd 2020.
- Download and install Etcher, the recommended image burner for Raspberry Pi. You can download Etcher at:
https://etcher.io - Insert the MicroSD memory card into the memory card reader.
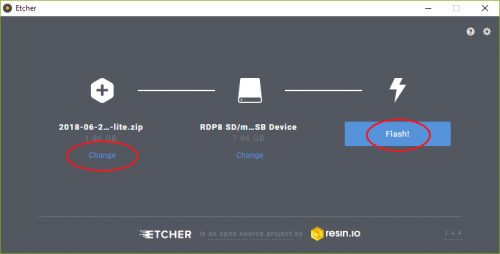
- Run Etcher.
- You can flash the operating system images directly from the downloaded ZIP-file, so go ahead and select the image file, and flash it to the memory card. Make sure you're selecting the right drive to prevent data loss!
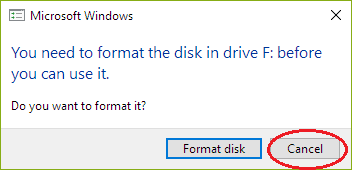
- After the flash completes, you may receive a Windows popup to format the memory card. Do not format, just hit Cancel.
- Etcher will report the flash has been successful.
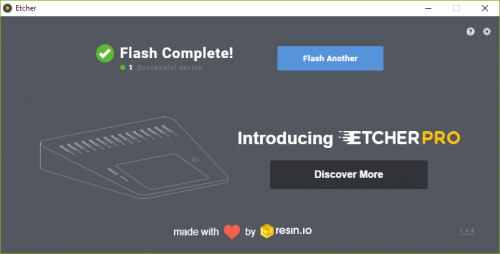
- The memory card is now ready for use.


Headless installation
On this tutorial, we will perform a headless installation. What this means, is we will not be needing a physical monitor or a keyboard to set up this Raspberry Pi. By doing this, we will eliminate the need to connect anything that is not needed on the Raspberry. After we've completed, you should be able to access your Raspberry Pi using an SSH client to do further setup. Feel free to hook up a physical keyboard, and monitor if you so prefer.
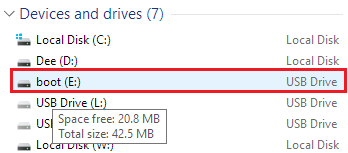
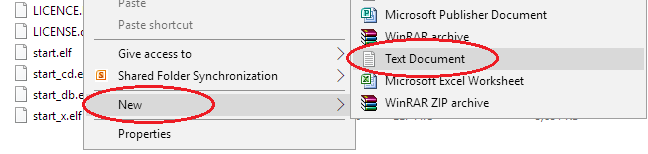
- Open up Windows File Explorer, then find the memory card you just flashed. You should see a drive letter labeled “boot” under Devices and drives. This is the Raspberry's Boot partition.
- If you cannot find the drive letter of your memory card, re-insert the memory card in your memory card reader. This should make the drive letter appear in Devices and drives.
- Open up the drive and create an empty text file. Rename the file “SSH.TXT”. The existence of this file will tell the Raspberry to enable SSH services on it, so that you will be able to log on to your Raspberry Pi.


Physical connections
 Once you have flashed the Raspbian operating system image to the SD memory card, and saved the SSH.TXT text file, do the following:
- Insert the memory card into the Raspberry Pi.
- Following the above picture as a guide,
- Plug in your serial-to-USB adapter.
- Plug in an Ethernet cable.
- Connect a Micro USB power cable to the Raspberry Pi. The system should will start booting up immediately.
Note: you may choose to connect the Raspberry Pi over Wi-fi to simplify connections, but for the sake of the tutorial, we'll work with wired connections for now. If you do decide to switch over to WLAN, there are instructions on the next section how to do so.
Powering up the Raspberry Pi
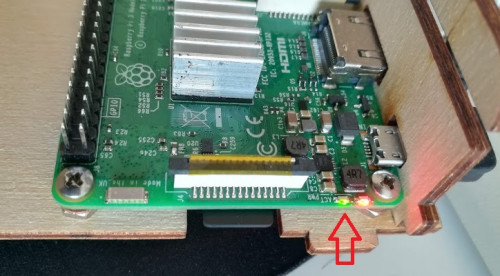
- It could take up to five minutes to boot. Watch the blinking green activity light on the Raspberry Pi indicating that the Raspberry is booting up (see image below with the red arrow). Once the blinking stops, wait another 15-30 seconds before proceeding. If the activity light of Raspberry does not blink at all after powering up, the MicroSD card may not be properly inserted, it may not have been properly flashed or the image used was corrupted. You may need to retrace your steps up to this point.
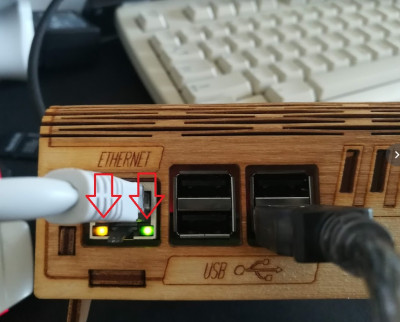
- Verify that the Raspberry Pi is connected to the network. You will see the Ethernet activity lights turn on:
- By now the Raspberry Pi should be booted, and it should be connected to your network.


Find out your Raspberry's IP address
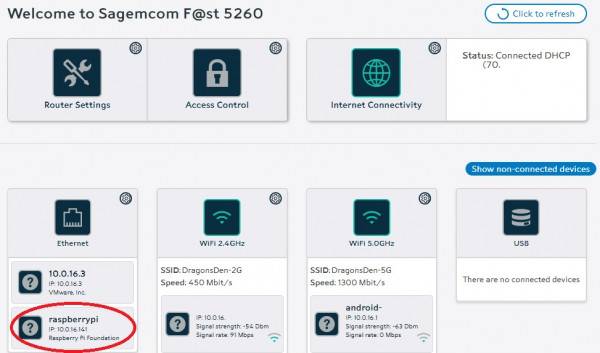
- To locate the IP address of your Raspberry Pi, easiest way is to log on to your router and find the IP there.
- By default, most routers homepage can be reached at http://192.168.0.1/, http://192.168.1.1/ or http://10.0.0.1/. Most routers username and password is admin/admin, root/root, root/password or a combination thereof. The correct default password can be found in the manual of the router.
- Once you have logged on to your router, look for connected network devices. You should see the Raspberry Pi and it's IP address. In my case it is 10.0.16.141. Save this IP address for later use.
- Alternatively you can use the official guide at:
https://www.raspberrypi.org/documentation/remote-access/ip-address.md - Alternatively you can use the Raspberry Pi Finder app from Adafruit at:
https://learn.adafruit.com/the-adafruit-raspberry-pi-finder/overview

Connect over SSH
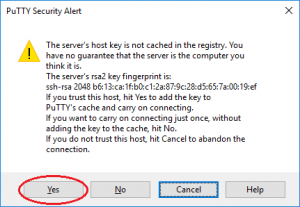
- Once you've figured out the IP address of the Raspberry Pi, you can connect to it via SSH. SSH server is now enabled, because we saved the SSH.TXT file on the root of the boot file system on the earlier step. You can use any SSH client to log into the Raspberry. I use PuTTY for this tutorial, which is highly recommended and can be obtained from:
https://www.chiark.greenend.org.uk/~sgtatham/putty/latest.html - Upon first connection, you will receive a warning message. This is normal. Click on Yes to add the security key to the local cache.
- It will prompt to log on. Username is
pi, password israspberry. Everything is case sensitive. - If you were successful, you should now be logged on to the shell of your Raspberry Pi.


Basic configuration and network settings
- For ease of access through SSH, you may want to configure a static IP address for your Raspberry Pi so that you can connect to the same IP address without always checking your router for the correct IP address. Later on, you can optionally reverse this change, if you want the Raspberry to auto-configure to be used in any network. In the version of Raspbian OS (2018 as of time of writing), you can set a static IP by editing /etc/dhcpcd.conf and uncommenting the example static configuration.
- I prefer Nano for quick file edits.
sudo nano /etc/dhcpcd.conf - Here's an example of my static IP configuration. As you can see, in my network I need to set my IP as 10.0.16.50 and router to 10.0.16.1. Please use the values that suit your network configuration. Quite often your router can also double as a domain name server, but for portability I've told Raspberry to just use the Google name server, 8.8.4.4. I won't use any other name servers at this time, but if you want to use more, you can add them to the same line, just separate them with a space.
# Example static IP configuration:
interface eth0
static ip_address=10.0.16.50/24
static routers=10.0.16.1
static domain_name_servers=8.8.4.4
- In Nano, to save the edited file, press CTRL+O and then press ENTER.
- To exit, press CTRL+X
- Disconnecting and reconnecting the Ethernet cable should be sufficient to update the IP address. In my case my new IP updated to 10.0.16.50, so I will reconnect PuTTY on this new IP address.
Go ahead and continue to the next part of this guide, where I will show you how to install the Virtual Modem script!
Skip to other sections
Get In Touch With Us!
Share your thoughts and report bugs on Discord.
